Establishing your stash: What you need

To be a spontaneous crafter you will need to establish a stash.  You need to have enough things on hand to provide choices while crafting but not so many things your spouse kicks you out.  It is a fine line and one that is fun to push up against.

While looking for things to stash you want to keep a few categories in mind.

Staples: What are the staples of your craft?  If you do a lot of quilting you are going to want to stash muslin and solid colors in your favorite pallet.   If you do a lot of knitting, what is your favorite colors and weights?  What are you always wishing you have more of?

Versatility: What kinds of items can be used again and again in different projects?  Things like beads, buttons and ribbons have a ton of applications and are great things to stash.

Finishing bits: What things do you need to finish projects?  Things like pipe cleaners for knit softies, googilie eyes for kids crafts (why only use two?  Seven or eight look better), Velcro and fasteners should be stocked up on as well.

Yarn University: Moisture

Different types of fibers react to moisture differently, and the key to a good project is to choose the correct fiber for the item you are knitting.  Below are the three most common types of fibers.

Cotton: Cotton wants to be wet, it wants to pull in those water molecules and love them, and hold them, and keep them as long as it can.  Cotton is ideal for absorbency and items that move around water like towels, dish rags and bath mats.  However, once saturated it will take a long time to dry.

Acrylic: Acrylic doesn’t want to be wet, so it starts out by shedding the water.  But after a little bit it throws a temper tantrum and says “Fine then! IF you want me to be wet I WILL BE!” and then grabs onto the water and holds on.  It doesn’t make good dish rags or towels and is an OK choice for winter wear such as mittens and hats.  This is especially true if wash-ability and fiber allergies are a factor, but once wet it won’t keep you warm.  It drys faster than cotton.

Wool: Wool hates to be wet, it can shed water droplets without absorbing them.  It does everything it can to stay dry and it will take any excuse to become dry again.  It will shed water because of gravity and items that have gone through the spin cycle of a washing machine are almost dry to the touch.  It also still keeps you warm while wet which makes it an ideal cold weather garment.

Organize your craft space to increase your craft time

If you are like me you are a busy person.  With work, cooking, cleaning, child care, child’s school commitments and family and friends my time is precious.  Sometimes I only have 10 minutes before I have to leave to pick up my kid to get some crafting done or 15 min as the pasta pot is coming to a boil.  If you have to drag out a sewing machine, set it up, or dig through boxes for other supplies you won’t be able to take advantage of those stolen moments.

So get yourself organized and dedicate a space to your crafts- even if it is only a table- and you can take advantage of those brief moments in time.  It will surprise you how much crafting you can get done if you don’t have to spend time setting up.

My space is the family room portion of a large dinning room, it also doubles as my work space so I keep my laptop there as well.  The space itself is maybe 6 ft by 8ft, with a room divider created out of bins and a dresser.

Shelves on my wall provide storage up to the ceiling.

Below the wall shelves is a kids dresser that my son out grew.  The bottom drawers are filled with yarn.  All the yarn is organized by weight and color so it is easy to find and attractive in the bins.

The top of the dresser holds frequently used equipment.  A jewelry box makes an attractive and functional place to store safety pins, bobbins and other sewing machine notions.   Everything has a place and everything is in its place.  The green bowl acts as a catch all until something can be organized such as buttons cut off a shirt going into the rag bag.

The space facing the room has a dresser found in the alley and restored by my husband.  This is the unofficial Chicago recycling plan.  I once put out a toddler bed that didn’t last 45 minutes before it was picked up.  Bins on top of the dresser are labeled with contents and small shoe boxes have organization for works in progress.

My button collection is one of my favorite things.  I have all the buttons sorted by color in glass jars.   I have these in my window ledge that my desk faces.  I get to admire them with the sun shinning through and if I need a green button- I know exactly where it is.

Providing adequate storage is key to being able to organize your stash, and once everything is at your finger tips it will amaze you how much more time you spend crafting.

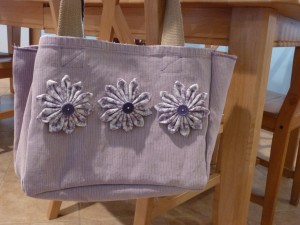
Kazinashi flowers placemat bag


I made another placemat bag and decorated it with three Kazinashi flowers.  This bag didn’t work out how I would like because the edges were triple thick and made it difficult to seam.  I had to cut off all the seamed edges to make this work out.  So if you make your own, make sure the edges aren’t really thick.

P1020171

Two sets of Mors bags

 In Betz White’s Sewing Green she has an article about Mors bags at http://www.morsbags.com/.  This site has a free shopping bag pattern and encourages the sewing of these bags from recycled materials or from your stash and then giving them as gifts or to hand out at grocery stores to stop the use of plastic bags. I have made 14 bags so far.  I have made a set of 7 bags from this reclaimed red table cloth that I got for $3.00 at the thrift store. 

Red brocade morse bags

Red brocade Mors bags

I got this table cloth on sale for .69, practically brand new at a thrift store.  I made a set of 5 bags and I put pockets on the outside.

Tuttie Fruitie Morse Bag

Tuttie Fruitie Mors Bag


Project Preview: Felted tablet cozy


Recently I talked about color and design layout.  In the laptop cozy less is more.  In this cozy more is more, but you have to push it over the threshold from cluttered and busy into sublime. 

I love Starry Night, so this is my felted version of it, using yarn to make the stars look like they are twinkling.

stary night

starry night

Preview: Felting projects: Falling flowers laptop case

 I would like take a moment and talk about design.  What young people or inexperienced crafters think is that experts can just put it together, it looks awesome and isn’t everyone impressed.  This is encouraged by DIY shows and craft gurus.  What you don’t see is the 40 flowers that were cut out to get that perfect one.  The 4 or 5 mock ups before something is ready for TV.   Possibly even a crew of people all making piles and pile of the project in different stages of completion.  I don’t have that kind of time, and if you are a hobby crafter you probably don’t either. 

So here are some of my design points as illustrated by the laptop cozy from the felting project book that is in development.

Falling flowers laptop cozie

Falling flowers laptop cozy

First: Color scheme.  Be in a place with good, bright light.  Natural sunlight is best.  Make a pile of your felt that you want to use.  What does the pile look like when you add a bit of unexpected color, like yellow?  Remove it?  Does anything not look quite right?  Remove those colors.  This will help you decide based on what you have on hand what looks good together.  You will have much more than you need for the project.  That is ideal.

Lay the pile out so some pieces show a lot, then change it to only a little show.  What looks best to you?  This will help you choose which colors will be the most used and least used. 

Colors look good together when they are the same value, or tone, or have a common base color (sometimes called a mother color).  There is science behind this, but that become boring.  At some point you will just know that something looks good, like everything clicks in place. 

Not sure about the colors yet?  Don’t rush it and take your time.  Add or remove colors, for a small piece you want to only have 2 or 3 different fabrics unless you have 20 different fabrics.  This is my all or nothing principle.  Less is more unless you have a huge amount, then more is more.  Try adding in  just a little of an unexpected color that is not in your “theme” color, like a little purple to a pile of orange.  This can totally transform the look.

Embellishment color: The embellishment color is the perfect way to transform what you are looking at.  Trust me when I say that without the little yellow buttons the cozy looks incomplete.  I was thinking about pink buttons at first and laid that out, but it just wasn’t right.  Use beads or buttons of that color to bring the other colors to life. By using the embellishments to add in this color is highlights the color.

The other secrete to design: Lay everything out first.  Does it look complete?  Does it give you the feeling that everything is as it should be?  If the answer is no, then take a few design elements a way, add them back.  Which is better?  This is a lot like an eye exam where they ask which lens is better until the two lenses look the same and you can’t tell the difference between the two.  You might go through 5 or 10 or 15 layouts.  This is the part that they never show on TV.  The part where you spend 20 minutes laying something out that isn’t done yet, moving pieces around, adding them back, cutting out more pieces you just spent 20 minutes cutting out before.  Changing all the buttons from pink to yellow.  Changing them back.  You might end up with a pile of pieces that you cut out that you don’t need.  That is OK, save them for another project.  It is just part of the process.  Now pin everything into place, or if you can’t do that because of the steps needed to assemble, take a picture of it with your digital camera to help remind you.

Now, you have something perfect and unique to you.

Preview: Felted knitting project bag


I love knitting, and I always have one project going that I work on while waiting at the park or in front of the TV at night.  I have had a number of project bags.  I tried a thrift store purse, but it was too small and had too little storage.  So I designed and made my own, with tons and tons of custom pockets in the inside.  But I learned that if you lean over just the right way your double pointed needles fall off and go bouncing and rolling all over the floor.  Also, it is hard to dig through pockets on the inside, even when you KNOW, you put it away right last time.  I ended up making a knitting essentials case to go in my knitting bag.  I take this out while knitting setting it out like an old fashioned writing desk.

Then I thought- what if you could safely store the notions on the OUTSIDE of the bag with a flip out pocket.  On the inside have a pocket for your working ball of yarn so it doesn’t tangle, and the outside has your scissors, measureing tape and extra needles.  So here is the next generation of my knitting bags.

P1020108

Preview: Felted Projects – headband

These headbands have a strip of elastic in the back to make them fit snugly but comfy. 

With the pink one I used a sweater that had a little bit of pearls on it.  I have retained these as an added design element.  I feel like these are the “semi-homemade” of crafts, why create from scratch when someone else put in the labor?  I love Sandara Lee by the way, that is my type of cooking.

Pink headband

Pink headband

Even though this is blue, I wanted to call it cherry blossoms because the shape of the flowers remind me of delicate cherry blossoms.  Having a grouping of smaller items together creates visual impact.

Cherry blossom headband

Cherry blossom headband